Tuesday, July 3, 2012

Mashed Potatoes? You tell me!


Love mashed potatoes? Me too! But they're not the most diet friendly food, to say the least! Some of the best advice I've gotten from my mother when trying to lose weight was to not eat carbs with dinner (rolls, potatoes, etc.). This one rule has been my saving grace, but it's also hard because I love those things!

So, here is a healthier alternative to mashed potatoes that eliminates the carb from your meal. (PS, this is my husband's dinner plate, thus the double serving of meat and ranch on his salad).

1 Head of Cauliflower
2 Tbsp butter or if you can do olive oil, it's even better!
Salt and pepper to taste

Steam your head of cauliflower after cutting into florets. Make sure it gets well steamed because the next step is mashing it with a fork. Use some of the water you used to steam it to create more of that creamy mashed potato feel. However, my husband swears it's the butter that TRULY makes them replicate the mashed potato taste. (I'm slowly "weaning" him if you will into olive oil, haha). I promise, the first time we had this, it fooled us into thinking we were having mashed potatoes (my dad originally served them to us on a visit). 

So, there you have it. A delicious and healthy alternative for those cursed (yet still delicious) mashed potatoes.

4th of July fun with straws!


Wednesday, June 20, 2012

Friendship Week - Summer Camp Party


Tuesday, May 29, 2012

Master Shopping List

So, for almost 2 weeks now I have been working on something AMAZING! At least, I think it's amazing because it is going to be making my life so much easier! Seriously, so excited! I got inspiration from Pinterest originally. See?

I saw this menu board and was so inspired! I spend SO much time couponing, menu planning, flipping through cookbooks, etc. every week and I knew this menu board was a must for me! So, while I started compiling my list of menu options so I could make those cute, color coded cards, I was inspired again! I wanted to make a master grocery list for myself that I could simply print out every week and have my list already made. Sounds magical, right? I know...

So, I sat down and made a list of ALL the things my family consumes every month, from produce to snacks to dinner items, to seasonings. I wrote it all down, PHEW! I had them sectioned off, by the way, starting with produce, Deli, Frozen, Dairy, Canned/Bottled, Baking, Grains, Snacks, Beverages, and Bulk items. After I had all my items, I took 3 different colored highlighters and went through to "label" my items: pink was once a month purchases, Orange were biweekly, and yellow was weekly. If it didn't end up with a label, that means I only purchase these items occasionally on an "as needed" type basis.

Now to the computer! I made four sheets in a word document (because I will be shopping weekly, so I have a schedule for week 1, week 2, etc). Then, I made each of my categories on each sheet and started dividing them up between the weeks. If there were 12 items under a certain category, I divided them equally, being careful to not pair 2 more pricey items together on the same week. And there I have my rough draft. I say rough draft because I may need to adjust my scheduling as I go to make it work better (we can't all be perfect the first time, right?). I think I got it pretty good though ;) After I did the food, I decided to include my cleaning and toiletry supplies in the schedule as well. Hubby will be so pleased to not have to run to the store for deodorant! Haha... I colored items that are periodic purchases in orange on my lists. So, if you'd like a template to make your own, click on the image below to download mine:

 Just as an additional tip, these lists are all things I CAN buy that week. Doesn't mean I have to if we have plenty in the pantry! Also, as I mentioned before, I'm a couponer. So, if a screaming deal arises that I gotta pounce on, I will be swapping those items out with a different list for that month, make sense? That way, I know I'm still saving the MOST money possible. Same goes with the meat (never know what's gonna go on sale!). My meat items listed are things we use in that genre of meat. I try to spend $20/week on meat for our family (or cheaper if I can!).

Also, if you wanna make your own fabulous menu board such as the one I shared above, I also have a template you can download for the cards. You will obviously want to fill in your own recipes, but it gives you an idea! You can download that one here.

 I hope I've inspired someone to get organized with your menu planning and grocery shopping! It really does save money and causes MUCH less stress since you won't forget anything at the store! With a master list, your pantry should stay well stocked and you should be avoiding impulse purchases. Only get what's allowed on your list! I read in a fabulous couponing mom book to look at your hours that you put in to saving your family money as your paycheck to your family each week. Love it! Hope your grocery shopping becomes more enjoyable and organized!

Saturday, May 19, 2012

Space Saver Book Storage

 So, I have been working like crazy on so many projects around my house! But I am doing a post on something I actually created months ago! I took pictures back then, but I just made more tonight, so now I'm doing a tutorial finally! I got this idea from compiling different ideas I saw on Pinterest. I really liked the IKEA spice rack book storage, but we don't have an IKEA here and I really like to work with what I got ;) I saw someone else had used a double curtain rod to create some book slings! Genius! But I know how expensive curtain rods can be and since I'm a cheap skate, I thought, couldn't I just nail a pocket to the wall? And the answer is yes, my friends!

You start with a simple rectangle (mine measured about 20" by 27"). I totally eyeball them, though. Just fold your fabric in half to about the depth you want and the width, cut and voila, you are ready to sew!

If you can sew a straight line, you can make these, promise! Just fold it in half, right sides together and sew up the short sides. Then hem all the way around the top. Flip right side out and there you have it!

Now, for the nailing. Make sure you get that nail in the corner so the sides don't flop and make sure your nail head has a "lip" to it (meaning, your nail head is larger than the nail itself so the fabric doesn't just slip right over after you puncture it).

Cute, right? Vinyl makes everything better too! My kiddos really love sitting here and looking through all the books! I have some of these in each kids room and in the hallway between their rooms! Way better than a messy bookshelf around every corner!

Tips for a sturdy book sling:
  • A sturdy fabric is helpful to hold the weight of the books and the nail hole won't rip! ( I used flannel in these pictures)
  • Like I mentioned before, making sure you have a good size nail head!
  • Nailing also in the middle (only through the back layer) of the pocket and also through the double thickness is a good idea!
  • Sewing an additional vertical line down the middle to make separate pockets is good if your pocket is kinda long. This helps prevent a saggy middle!
Okay, so while I'm here and speaking about flannel, I thought I'd share some other things I've done with flannel around my house. Jo-Ann's always has that stuff for WAY cheap on Black Friday, so you gotta get creative, right?!

Monday, April 30, 2012

Nutritious Faux "cheesy" popcorn

Today, I am going to be sharing a favorite recipe of mine and my kiddos love it too! And you know what is so awesome about it? It's super healthy and low calorie! Woo hoo! Perfect for when you need a "salty" fix!

For starters, you need popcorn kernels and an air popping machine. If you don't have an air popper, you need one for sure! Air popped popcorn is so much healthier and lower in calories (you know, not being popped in oil and all). This part is so much funner with a little helper! My kids LOVE watching that popcorn start exploding out the top! On this day I took pictures, my Kelsie Lou was the only one here and/or awake, so she was my most awesome helper!


After you get your corn popped, you'll need some olive oil. A little bit of facts about olive oil:
  • It's a healthy or "good" fat, which helps aid in digestion and helps your body absorb nutrients from other foods!
  • It can help improve cholesterol levels
  • It's still a "fat" food, so moderation is key in order to gain the health benefits! Remember, a serving size is only 2 teaspoons!
So, you are going to lightly drizzle your popcorn with the olive oil and I like to use a spoon to stir it around so all the kernels get lightly coated to help our other toppings stick! (If you have distributed your olive oil but are still feeling the need to add more for sticking factor, I use nonstick cooking spray (it's fat free). That way, I avoid adding those extra calories and fat.

After you get your olive oil, you are going to salt your popcorn. Now, here is where I can misbehave a bit, I like my popcorn salty! Ha ha ...But I use RealSalt. What is RealSalt you ask? It is salt with no heat processing, chemicals, or additives. But what is DOES have is many trace minerals still intact, including iodine. It is delicious too! So sprinkle away I say!

The next topping to sprinkle that will give you the "cheesy" flavor is nutritional yeast. I grew up stirring this power food in my orange juice, but it tastes so delicious with salty foods! It has a unique, nutty cheesy flavor. Makes it sound yucky to add to orange juice when I describe it that way, but I still love it in my juice. You can buy this in the health section of your grocer or I now buy it in bulk from Winco. It is an excellent source of protein, fiber and rich in vitamins, especially the B vitamins and folic acid. Anywho, take those flakes between your fingers and squash them as you sprinkle so it's more powdery. Make sure you annihilate those flakes extra well if you have picky eaters that have an aversion to odd new additions to food! Ha ha. Anyway, I sprinkle a lot, but do as much as you like here. My Kelsie Lou licked that yeast right off her fingers after helping with the sprinkling!

Now you are ready to eat your delicious, healthy snack! Enjoy!

Additional tips for using yeast: I also sprinkle this on buttered whole wheat toast (my baby's favorite), stir it in spaghetti sauce or drink it in my juice, as I mentioned before. I have recently read to sprinkle it on garlic bread, I bet that's delicious!

Thursday, April 19, 2012

Boys Wallet Tutorial

It's always a challenge finding things to sew for boys. But I sure do love finding projects and my oldest boy loves it too (little one is too young to notice!). So for Easter, I sewed my son a wallet to put in his basket. He loves it so much and it is so simple to make! Even better, I only needed a scrap of fabric I had left over from a different project! So, here's a list of supplies:

Scrap Fabric
Fusible Interfacing
6" zipper
Velcro Square


I am very much an "eyeballing it" type of person when it comes to measuring my projects, but I took measurements after I cut to give you an idea of the size. So, you need to cut (2) 7.25" x 3.25" rectangles, (2) 7.25" x 2.75" rectangles, and one 3" x 3" square. Additionally, cut one piece of fusible interfacing to match each set of rectangles. Iron the interfacing onto the wrong side of one of each rectangle size (see picture below if you're confused). Now you should have all your pieces ready for action!

You're going to start by folding your 3" square piece in half, right sides together and sew along the edge. Turn right side out and fold a bit of the top back inside and stitch close to the edge to create a finished edge. This piece will be your strap. So, you will no sew velcro onto the inside of the strap (over the seam) and near that finished edge you just sewed. Set the strap aside.

You will now be working with your largest rectangles. On your piece with the interfacing you're going to sew the other half of your velcro on the right side of the fabric near one of the short ends (doesn't really matter which one at this point). See the picture if you need more of a visual for placement. Now, with right sides together, you're going to sew the largest rectangles together. Leave about 1 inch at least open for turning. Before you turn it right side out, clip the corners so it will lay nicely. After turning it right side out, iron it flat turning in that edge of the opening. Sew the opening shut close to the edge and continue to create a top stitch around the whole rectangle. Set that piece aside now.

Now take your next set of rectangles. You need your interfaced piece and a ruler for this next step. On the interfacing, about 1" down from the top, you are going to draw a 5"straight line with your ruler. On the ends of that line, you will then draw little v's (see picture below). Cut along those lines.
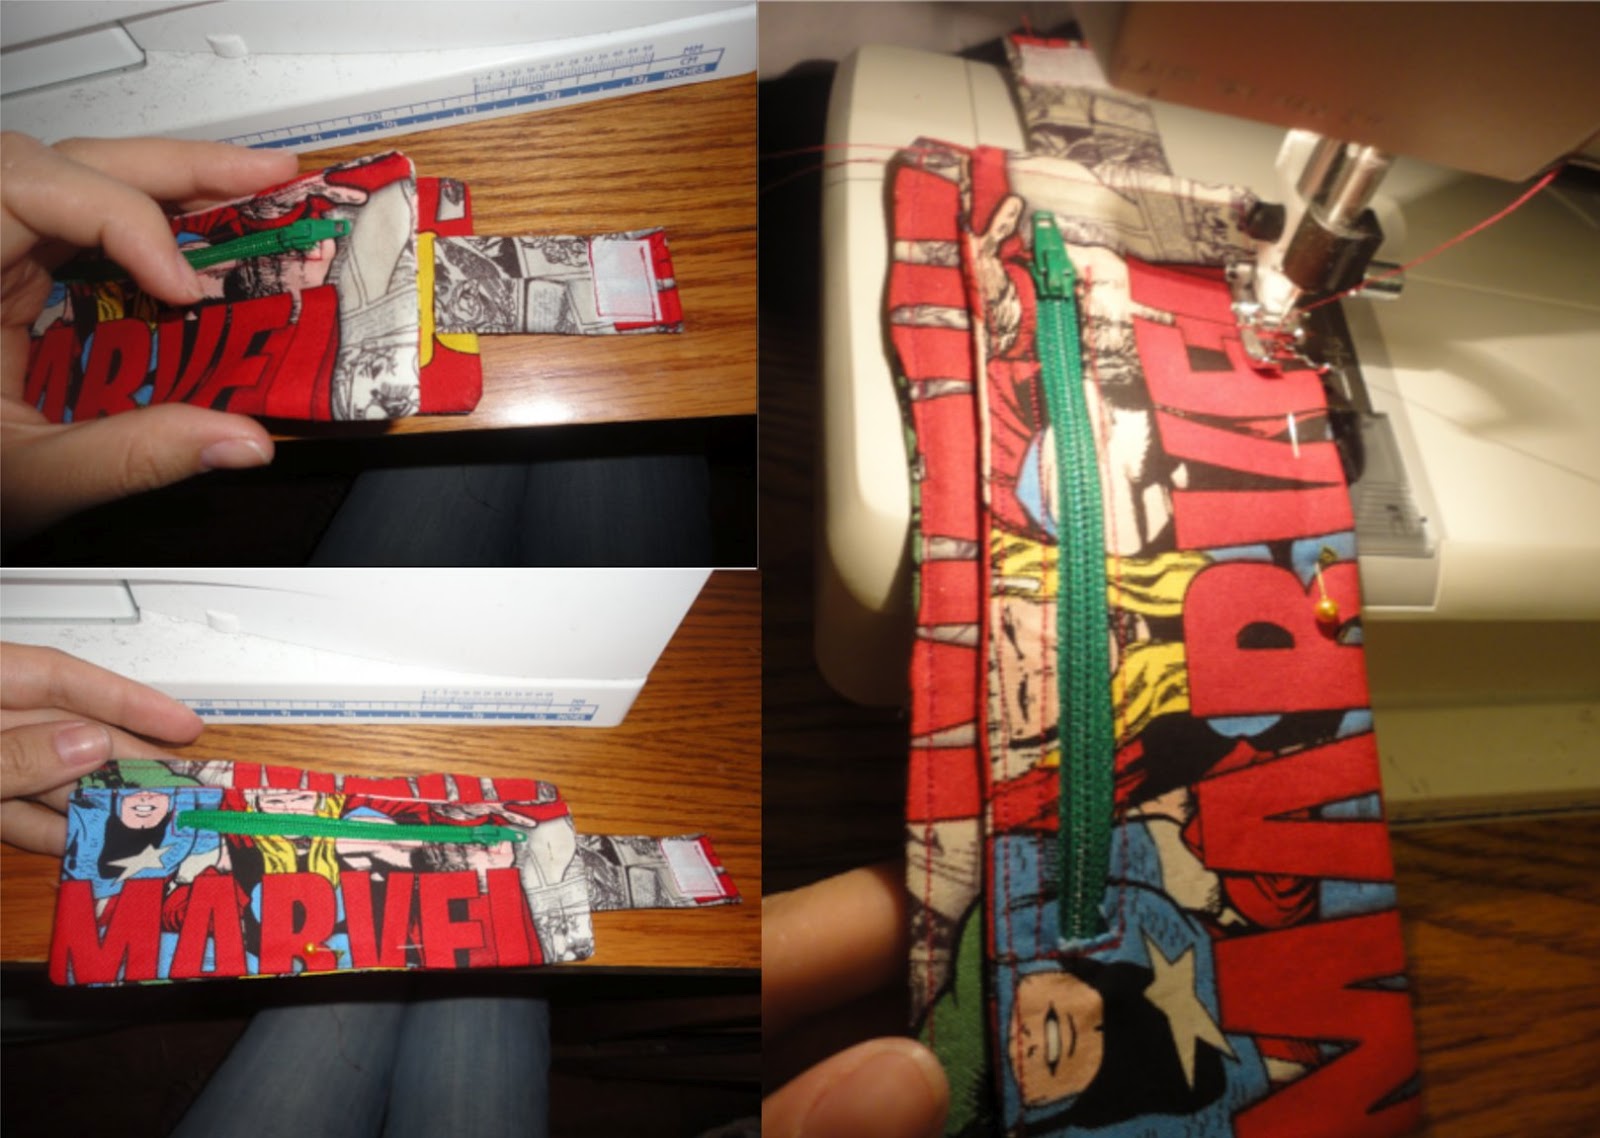
Now you will fold the edges in of that opening and iron it flat. It should be a skinny rectangular opening with the flaps on the interfaced side. Now place your zipper onto the opening so that the zipper pull is against one side and pin it in place as shown in the picture. Stitch all around the zipper using your machine's zipper foot. If you need to shorten your zipper, be sure to stitch back and forth a few times over where you want it to end and snip off the extra!

Now put the two rectangles right sides together, sew around the edge with an opening, clip the corners, flip, iron, top stitch just as you did the previous set of rectangles!

Now for assembly! You are going to stack the layers, starting with the largest rectangle. The velcro should be touching your desk and to the left. Then place your strap centered on the right with the velcro facing up and the raw edge in almost an inch. Next, place your zipper pocket, zipper side up, lining up the bottom and side edges. Pin all these layers in place and stitch right over your top stitch.
Now, fold the wallet in half, creasing it with your fingers, velcro it shut and there you have it! Your little one will be feeling very manly carrying some cash in his very own wallet! My son won't go to the store without it now!