Thursday, April 19, 2012

Boys Wallet Tutorial

It's always a challenge finding things to sew for boys. But I sure do love finding projects and my oldest boy loves it too (little one is too young to notice!). So for Easter, I sewed my son a wallet to put in his basket. He loves it so much and it is so simple to make! Even better, I only needed a scrap of fabric I had left over from a different project! So, here's a list of supplies:

Scrap Fabric
Fusible Interfacing
6" zipper
Velcro Square


I am very much an "eyeballing it" type of person when it comes to measuring my projects, but I took measurements after I cut to give you an idea of the size. So, you need to cut (2) 7.25" x 3.25" rectangles, (2) 7.25" x 2.75" rectangles, and one 3" x 3" square. Additionally, cut one piece of fusible interfacing to match each set of rectangles. Iron the interfacing onto the wrong side of one of each rectangle size (see picture below if you're confused). Now you should have all your pieces ready for action!

You're going to start by folding your 3" square piece in half, right sides together and sew along the edge. Turn right side out and fold a bit of the top back inside and stitch close to the edge to create a finished edge. This piece will be your strap. So, you will no sew velcro onto the inside of the strap (over the seam) and near that finished edge you just sewed. Set the strap aside.

You will now be working with your largest rectangles. On your piece with the interfacing you're going to sew the other half of your velcro on the right side of the fabric near one of the short ends (doesn't really matter which one at this point). See the picture if you need more of a visual for placement. Now, with right sides together, you're going to sew the largest rectangles together. Leave about 1 inch at least open for turning. Before you turn it right side out, clip the corners so it will lay nicely. After turning it right side out, iron it flat turning in that edge of the opening. Sew the opening shut close to the edge and continue to create a top stitch around the whole rectangle. Set that piece aside now.

Now take your next set of rectangles. You need your interfaced piece and a ruler for this next step. On the interfacing, about 1" down from the top, you are going to draw a 5"straight line with your ruler. On the ends of that line, you will then draw little v's (see picture below). Cut along those lines.
Now you will fold the edges in of that opening and iron it flat. It should be a skinny rectangular opening with the flaps on the interfaced side. Now place your zipper onto the opening so that the zipper pull is against one side and pin it in place as shown in the picture. Stitch all around the zipper using your machine's zipper foot. If you need to shorten your zipper, be sure to stitch back and forth a few times over where you want it to end and snip off the extra!

Now put the two rectangles right sides together, sew around the edge with an opening, clip the corners, flip, iron, top stitch just as you did the previous set of rectangles!

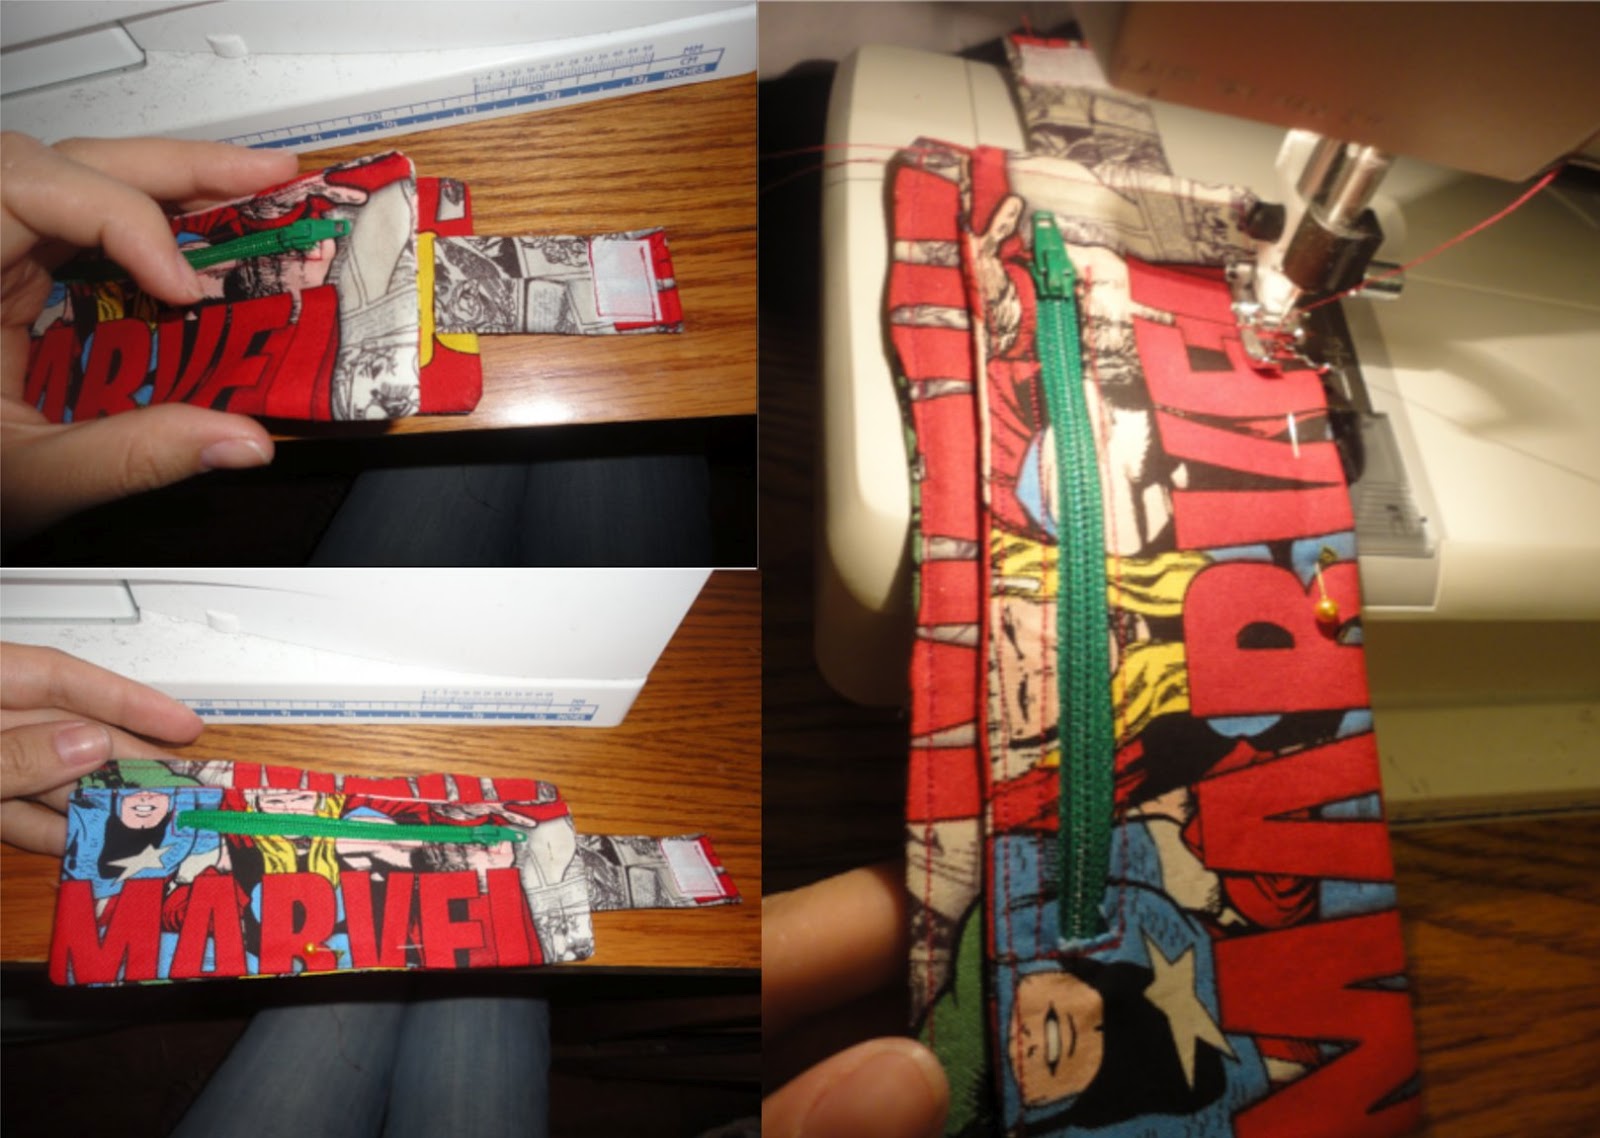
Now for assembly! You are going to stack the layers, starting with the largest rectangle. The velcro should be touching your desk and to the left. Then place your strap centered on the right with the velcro facing up and the raw edge in almost an inch. Next, place your zipper pocket, zipper side up, lining up the bottom and side edges. Pin all these layers in place and stitch right over your top stitch.
Now, fold the wallet in half, creasing it with your fingers, velcro it shut and there you have it! Your little one will be feeling very manly carrying some cash in his very own wallet! My son won't go to the store without it now!

Monday, April 16, 2012

Copy Cat Bare Minerals

My post today is a beauty product review. I am always on the lookout for a great beauty product that makes my getting ready in the morning simpler, faster, better. Aren't we all? I am not a high maintenance makeup person. I like to keep it fairly simple because I figure the more natural I look, the less scary, I mean different I'll look when I'm not wearing it, right? Plus, I'm just downright lazy about it and don't like to take more than 30 minutes to get ready, hair and all.

Well, quite a few years ago, I discovered Bare Minerals foundation and I fell in love!It is so lightweight, fast to put on, looks amazing on all skin types, covers well, and gives that great healthy glow we all strive for on our skin. Not only that, but my skin really did improve (as far as breakouts go) after I started wearing it. So, I am totally a Bare Minerals girl.

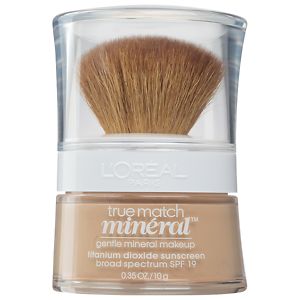
However, the semi-hefty price tag on it has caused me to wander and try other products on the occasion. Plus, I have to buy it at a salon-type beauty store instead of say, Target! So, anyway, I have really tried every other kind of mineral makeup from Mary Kay to Physicians Formula to try to save myself a buck and longer trip to the store, but it was always a waste because nothing has even come close to Bare Minerals. But a week and a half ago, I was out of my Bare Minerals and was in a pinch. I was shopping at Target and had a coupon for L'oreal face product. So, I thought, "What the heck, I'll give something new a test run." After scouring the isles looking for something I hadn't already tried, I found L'oreal True Match Naturale Gentle Mineral Makeup. So, coupon in hand I headed to the cash register and paid my $6.99 for it (WAY cheaper than my true love).


I was super excited to try it the next day, but honestly, expecting disappointment as has always happened before. Let me tell you how stoked I was to see nearly the same results as Bare Minerals! I am so very impressed with this product. It covers great like Bare Minerals, blended great and still had a subtle glow! Yahoo! All in all, I found a very good replacement for when money is tight. Bare Minerals still is a tad bit better (it has more of a glow and that "sheer" look), but you can barely tell the difference in my opinion. So try it out and tell me what you think!

Have a beautiful day!!!

Wednesday, April 11, 2012

Party Ruffle Skirt Tutorial

I hope everyone had a Happy Easter with their family! We sure did and I enjoyed so much seeing my 3 cute kids in their matching outfits for church! The boys didn't last in their ties, of course, but my little princess enjoyed wearing her skirt all day long! And it is mighty cute, if I do say so myself! So, here's the tutorial for it!

In preparation ahead of time, I had FINALLY tried out my bias strip maker and made some super cute polka dotted bias tape (I made a few yards, you will need 8' total for this skirt, using these measurements). But if you don't have a bias tape maker, have no patience for making your own bias tape, or have no desire for buying pre-made stuff, just a simple hem will work just as well.

Okay, so now for the actual instructions! This skirt with these measurements was made for my almost 3-year-old, who is quite the skinny mini, but has ridiculously long legs! So, if you need to make it bigger or smaller for your little miss, take that in consideration. So, first cut 3 rectangles: 2 ruffles, 5.5" x 48" and 1 skirt piece 10" x 24". The actual skirt will be longer than 10" by the way.

First, you need to "prep" your skirt piece by sewing down the 10" edge, right sides together. You should have a "hoop" now. Next, hem the bottom by folding 1/2" up and sewing all the way around. After you've hemmed the bottom, you are going to create the elastic casing at the top by folding down 1" and sewing along your 5/8" guide on your machine, but leaving a small gap in your stitch, which is where you will feed the elastic through when it's time (not yet!). The next step in prepping your skirt is wrong side out, fold it in half with your stitch on one edge; carefully using a straight edge of some sort, mark a center line with a washable fabric marker along the fold. Now you can set your skirt piece aside.


  Now, you will get your accent bias tape and fold it around the bottom edge of your ruffle rectangles, stitching it in place as you go. Clip your tape even with the edge of your ruffle. Or, if you're one of the hemmers, go ahead and hem! Next you are going to create a "hoop" out of the ruffle like you did the skirt, stitching the short end, right sides together. At the top of the ruffle, you are going to fold down 1/2" as if you were "hemming" it, but instead of a normal stitch, you are going to use the longest straight stitch your machine has and sew along the fold, leaving a small gap where your seam is. DO NOT backstitch at the beginning or the end, leave extra thread hanging off. Make sure both of your ruffle rectangles are ready like this before moving on.

Now it is time for the pinning. You will need your skirt piece right side out. Take your first ruffle, find the center across from your seam and pin it with a vertical pin to the front center of your skirt you marked earlier; you will line it up roughly one inch away from your casing stitch. Now, line up the ruffle seam with the skirt seam, still staying one inch below the casing stitch, and pin it with another vertical pin. Now is the tricky part. You are going to gather your ruffle starting by the seam where you left thread hanging. Gently pull the bobbin thread so your fabric starts to gather. Take this part very slow and gentle so your thread doesn't break. If you find it's getting hard to pull,work your gathered fabric "down the line" to free up space where you're pulling. Gather it all the way to the center pin, until the ruffled part is the same length as that half of the skirt and pin it in place. Repeat on the other side. Now, I went ahead and stitched it in place so I didn't have to worry about things falling out of place while pinning and gathering the other ruffle.

Now you will pin and gather the second ruffle in the same manner, this time lining it up just under where the bottom of the first ruffle hits. Stitch it in place. You should have two tiers of super cute ruffles!

Now, you just need to add the elastic to the inside of the casing. Measure your princess' waist and cut your elastic. Pin a safety pin onto one end of your elastic and push it through your opening. Thread it all the way until it comes outside the other end, being careful to not pull your end through. Now, using a zig-zag stitch, sew your ends of elastic together, back and forth a few times so it stays in place. Now, stitch your opening shut and admire your work!


Monday, April 9, 2012

Power Smoothie

I am here to share an amazing recipe with you that I LOVE to have for breakfast! I call it a monster smoothie, power smoothie, or a Hulk smoothie when being served to my kids :) Ingredients are as follows:

1 Cup Water
1 mango, peeled and pitted
1 banana, peeled
 1 Cup Spinach leaves
1 Scoop vanilla whey protein
2 Tbsp Brewer's Yeast
Scoop of ice

I have a Blendtec Blender (pretty much exactly like Vitamixer) which I love so much, so it really annihilates everything! But a regular blender works just as well. I just plop in all the ingredients and serve it up. YUM! Even my baby loves it! A very healthy, filling and lightweight meal replacement or treat for the kiddos.

This recipe is so versatile, I don't always use a mango. Sometimes strawberries, carrots, grapes, kiwis...whatever! But it is so delicious and starts off my day with a good serving of spinach, which I love. And I love it even more because you really can't taste it, PROMISE! Carrots are a great addition if you have a Blendtec or Vitmixer, but I don't recommend using carrots if you have a regular blender. Just a tip!

Friday, April 6, 2012

Clip On Boys Ties

Well, here I am with Easter approaching and I have been SWAMPED with it being spring break and all; trying to keep the kiddos busy and happy! However, I have been determined to make my 3 munchkins their matching ensemble for Sunday! I cut out the ties almost 2 weeks ago and have just now finished them the last two days, how lame am I? 

I have two boys and a girl, but still like everyone to match. So, I made the boys matching ties of course, and am currently working on Little Miss' skirt. Here is a tutorial for sewing a clip-on boys tie. 

Materials Needed

1/4 yard fabric
piece of fusible interfacing
matching thread
alligator clip

First comes the cutting. I have an 8 month old baby and a 5 year old to sew the ties for, so for my baby (he was sleeping while I was sewing of course!) I measured the length of one of his button-down shirts and for my 5-year-old, I just measured from his neck to his hips for the length. Feel free to make them a little longer so they don't grow out of them so fast!

I found it was easier to start with a rectangle shape, so on a double thickness of fabric, cut whatever your length may be (mine was 15" for my 5-year-old and 12" for my baby) by roughly 5 inches, (again, my baby's I made slightly more narrow). Once you have your rectangle, start by cutting a point at the bottom; probably a good idea to fold it in half lengthwise before you cut to ensure you're making the point in the middle and both sides are at the same angle. Then, from where your angle hits at the sides, you will again cut at an angle up the length of the side of the rectangle (only going in half inch at the most) to create your tie "shape." Now you will also cut one sheet of this shape from your fusible interfacing. You will also need to cut another skinny rectangle for the knot at the top, roughly 4" by 6".


 Okay, now that you have your pieces, you are going to start by fusing your interfacing to one  piece of your tie shape on the WRONG side of the fabric. Now you will put both pieces right sides together and stitch around the edge, leaving the top open. Clip the point off close to your stitching as well as the side points so it will lay nicely. While you're at your sewing machine, fold your rectangle for the knot in half lengthwise, right sides together and stitch along the long edge. Turn both the tie piece and knot right side out and press. The seam on your knot piece should not be on an edge, but in the middle to create a "right" and "wrong" side.

After you press it flat, you will need to fold the sides of the tie piece in to meet in the middle and press again. 

Now you need that hand sewing needle and matching thread. I know, I know, I hate hand sewing. But trust me, this must be done! Starting at the bottom, tack the edges together in the middle every few inches going up the length of the tie. When you get to the top, you're then going to make an accordion fold so there's an indent on the front, top of the tie and stick your needle through all thicknesses, wrap around one time and make a knot. 

Now, you will take the knot piece,  wrap it around the top of the tie with right sides meeting together and pin it where it meets in the back and again at a fairly steep angle at the top (that way the knot will be wider at the top so it's realistic looking). Pull it off the tie and sew where you pinned; cut off excess fabric and turn right side out.

Now, you will slip the skinny opening back over the top of the tie and stitch it in place. Or, you could get lazy like me who, again, dislikes hand sewing, and hot glue it in carefully. I did that on my second tie and it actually felt more secure than my hand stitches on the other one.

Now, for the finishing touch, you will hot glue your alligator clip on the back top of your tie and VOILA! You have an amazing clip on tie for your little man made especially for him by mom :)

Stay tuned for my tutorial on the matching skirts to coordinate with the ties!

Thursday, March 22, 2012

Daylight Savings With Kids

This new daylight savings is killing me! I'm pretty used to it now, except for the mornings. Man, I just cannot get my butt into gear as early as I used to. I guess the trick is just to make myself do it so my body fully adjusts. But, I'm still resisting! Ha ha

We did something fun this year on our last night of it getting dark early. We played flashlight hide and seek! It was SO fun and our kids had a blast! Oh, and we had lots of fun too. We invited my sister over with our nephew and teamed up in pairs with an adult in each group to be in charge of the flashlight. Then we ventured outside.


I had Carter and Baby Zachary on my team and we had lots of fun when someone would shine their flashlight in our direction yet still didn't see us! It definitely was cause for LOTS of giggles! The last hiding spot we had, we had flashlights shining in our direction multiple times but we still were too sneaky! Finally, fussing from an unhappy baby gave away our location ;)


It will have to be something we do camping during the summer or something because we had a great time! Definitely something to look forward to on the difficult "spring forward" transition!

Wednesday, March 21, 2012

Ipod Arm Band

After I had my cute princess, I started running to lose weight, and I started running again after our last little munchkin was born. But to get me through those long miles I HAVE to listen to my music. And I don't know about you, but this is when I realized the serious lack of pockets on workout pants! I have nowhere to put my ipod except tucked in with the "twins" upstairs, and that becomes much too dark & sweaty for my poor ipod. So, I created an armband for myself out of some scrap fabric I had. I am not claiming to have invented this, I've seen them before. But if you have moderate sewing skills, this is how I made one!

I first laid out my ipod on a double layer of the fabric I wanted to use. I then cut with about 3/4" allowances on the sides and then measured 2X the length of the ipod plus approximately 1.5 inches. You will also need to cut an additional set of rectangles about 2.5 inches wide. For the length, measure the circumference of your biceps and subtract 2 inches. Now you are ready for sewing!

Start by putting your two larger rectangles, the pocket, right side together and sew all the way around the edge, leaving a one inch gap for turning. (I used 3/8" seam allowance). Then turn it right side out and press. Do the same with your band pieces.

Then do a top stitch 1/4" all the way around to give a nice uniform look and seal the openings.

Next, pin your arm band piece to the pocket piece starting about 1.5" from the top, centered in the middle. Sew a square with an X through it in the middle (not all the way to the edges of the pocket) to secure it to your "pocket" piece.

Now take your ipod and fold it in the "pocket" by folding your rectangle in half over it. Take two pins and mark on either side of where the headphones plug in at the bottom fold. Remove your ipod, open the fold and sew a button hole where you marked. Use a seam ripper to gently open the hole.

Next, you need a wide piece of ribbon, about two inches in length and secure it to the back, above where you just sewed the arm band. Now you will sew on your velcro. One piece to the end of your ribbon, the other to the "front" part of your pocket rectangle (the same side as the arm band, but the opposite end). This is also where I attached a bow, because I'm girly like that. But do as you wish!

Now you will actually create the pocket by folding your piece in half and sewing the sides closed. Be sure to leave your arm band free!

And for the finishing touch, take a 2" piece of elastic and attach it at either end of your arm band and VOILA! You are set for running in style with your music!

I hope that made sense! I love my arm band and if you decide to make one, I'm sure you'll love it too! Happy sewing!